Photoshop Tutorial: Making a Horizontal Image Vertical
 When I began learning to use Photoshop, I had NO guidance. Everything I know is self taught, and I think it's been as easy as it is because Adobe's programs (Creative Cloud) are so fun for me to learn. There are SO many things you can do with Photoshop - more than anyone could ever solely know. I know Photoshop comes with a learning curve; since I didn't have much help other than some YouTube videos when I learned to use it, I love sharing my knowledge and helping make such a fun program easier in any way possible!
Whether you're a photographer, blogger or just enjoy taking pictures - this tutorial is for you! I think it's probably safe to say that we've all been in a situation wishing that the "perfect picture" you took was just a liitttle more perfect. In this case, vertical. This happens to me all the time. In so many situations, vertical pictures are so much more eye pleasing. They're pretty in frames, desirable for photographers and for bloggers, they're ideal for Pinterest. Here's a quick, easy and painless process to creating (most) horizontal images into vertical images:
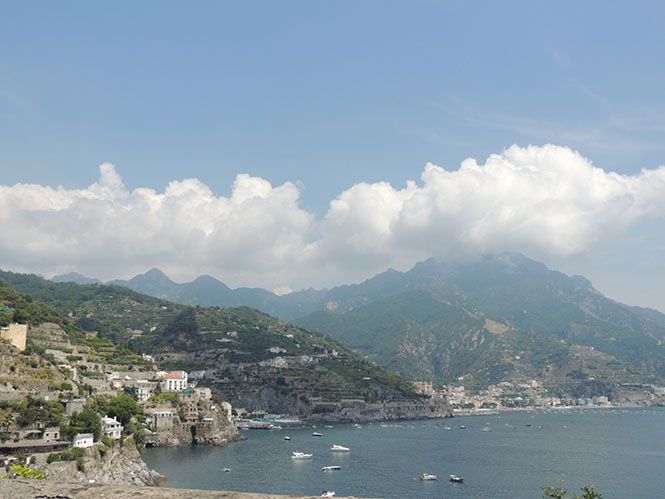
First, the most important thing to know is that this tutorial only works if the image you're trying to turn vertical has a top or bottom half that's solid colored and not too busy. In the picture I chose for this process, you'll see what I mean:
When I began learning to use Photoshop, I had NO guidance. Everything I know is self taught, and I think it's been as easy as it is because Adobe's programs (Creative Cloud) are so fun for me to learn. There are SO many things you can do with Photoshop - more than anyone could ever solely know. I know Photoshop comes with a learning curve; since I didn't have much help other than some YouTube videos when I learned to use it, I love sharing my knowledge and helping make such a fun program easier in any way possible!
Whether you're a photographer, blogger or just enjoy taking pictures - this tutorial is for you! I think it's probably safe to say that we've all been in a situation wishing that the "perfect picture" you took was just a liitttle more perfect. In this case, vertical. This happens to me all the time. In so many situations, vertical pictures are so much more eye pleasing. They're pretty in frames, desirable for photographers and for bloggers, they're ideal for Pinterest. Here's a quick, easy and painless process to creating (most) horizontal images into vertical images:
First, the most important thing to know is that this tutorial only works if the image you're trying to turn vertical has a top or bottom half that's solid colored and not too busy. In the picture I chose for this process, you'll see what I mean:
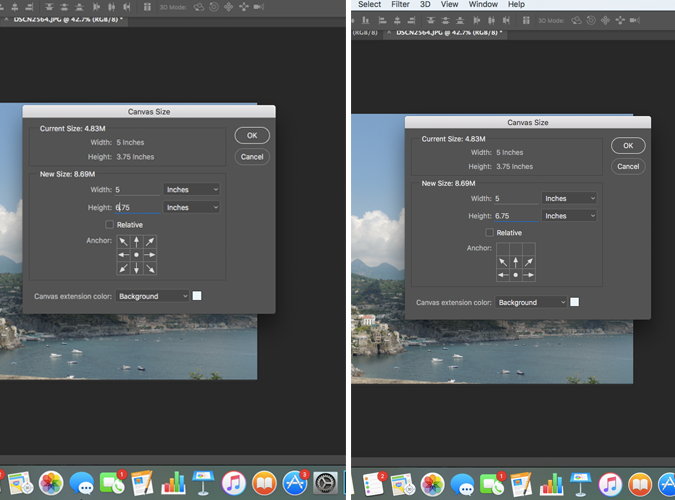
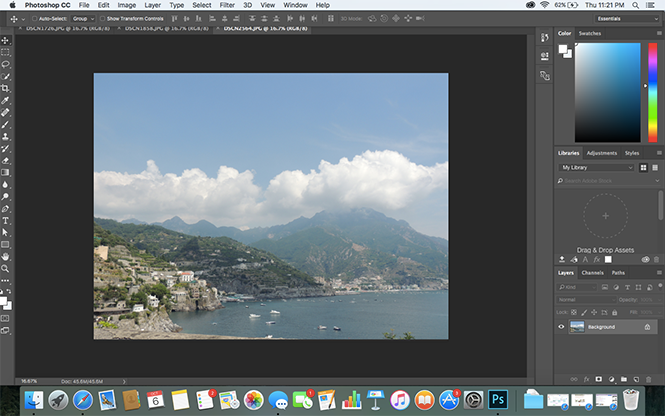 Basically to make an image longer (vertical), the easiest way is to stretch the canvas. Open up the image you want to work on and make sure the top or bottom has a clear, simple top portion. If you're going to be printing or framing these, first go to image - image size - and select the "fit to" drop down box. You can choose different printing sizes, like a 4x6, 5x7, etc. Next, change the canvas size. Go to image - canvas size - and make sure the unit of measure is on inches. Here, you want to increase the height by a few inches (pictured on the left below). It may take some trial and error, but I usually increase my image's height by 3-4 inches. Keep this box opened.
Pictured on the right (below), click on the arrow pointing downward in the "anchor" section. This will make the canvas only stretch upward, versus giving you extra space to work with on the top and bottom of the image. Once this is done, click "ok".
Basically to make an image longer (vertical), the easiest way is to stretch the canvas. Open up the image you want to work on and make sure the top or bottom has a clear, simple top portion. If you're going to be printing or framing these, first go to image - image size - and select the "fit to" drop down box. You can choose different printing sizes, like a 4x6, 5x7, etc. Next, change the canvas size. Go to image - canvas size - and make sure the unit of measure is on inches. Here, you want to increase the height by a few inches (pictured on the left below). It may take some trial and error, but I usually increase my image's height by 3-4 inches. Keep this box opened.
Pictured on the right (below), click on the arrow pointing downward in the "anchor" section. This will make the canvas only stretch upward, versus giving you extra space to work with on the top and bottom of the image. Once this is done, click "ok".
 Once you've changed your canvas size, your image will look like it does here; with a white space on the top:
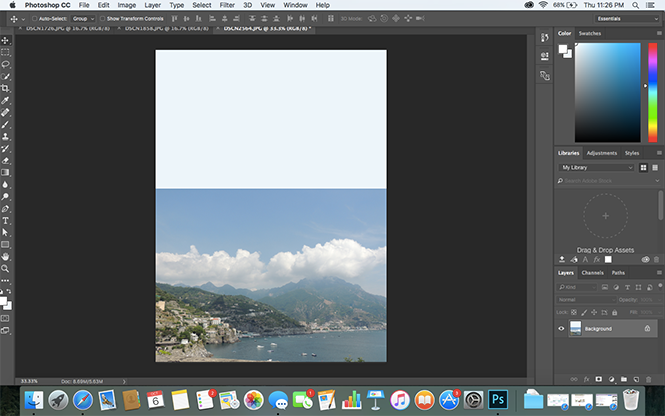 Now you can begin to decide which space you want to clone to add to the extra space you've created. This is why I mentioned earlier that an image with a simple, not-too-busy top portion will work best. On the tool bar, click on the rectangular marquee tool (second from the top). Drag the tool over the space you want to clone. For my image, I chose as much plain blue sky I could; I stopped at the top of the clouds so that it wouldn't duplicate those.
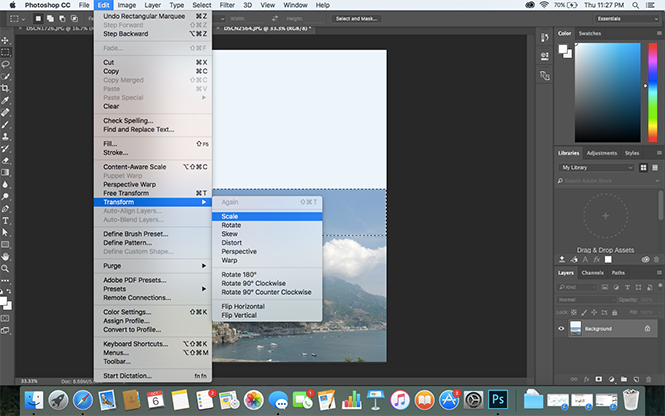
 Once you've selected a spot to clone, click on edit - transform - scale. This essentially opens up the tool for you to use to drag the selected portion upward.
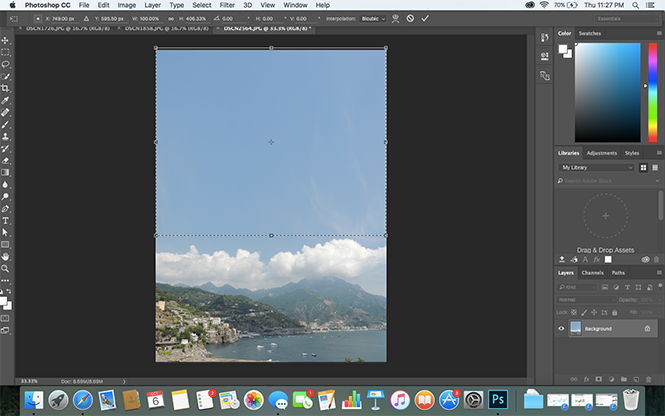
 Drag the scaled selection up to the top of the white canvas space. In my image's case, it dragged the sky up enough to make it look like I took the image vertically:
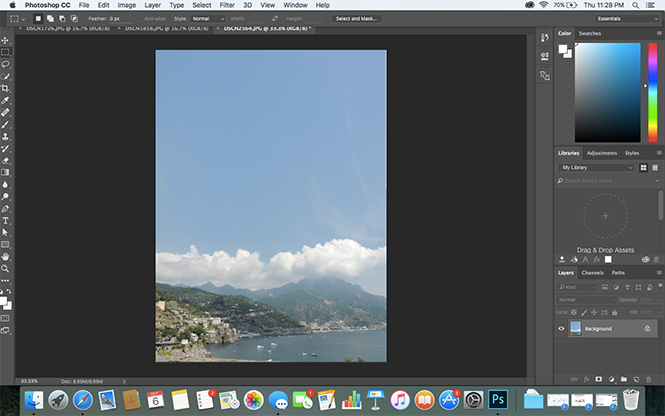
 Once you're happy with the way your image looks, press the check mark to save your scaling. Boom! All done -and you now have a vertical image. ; )
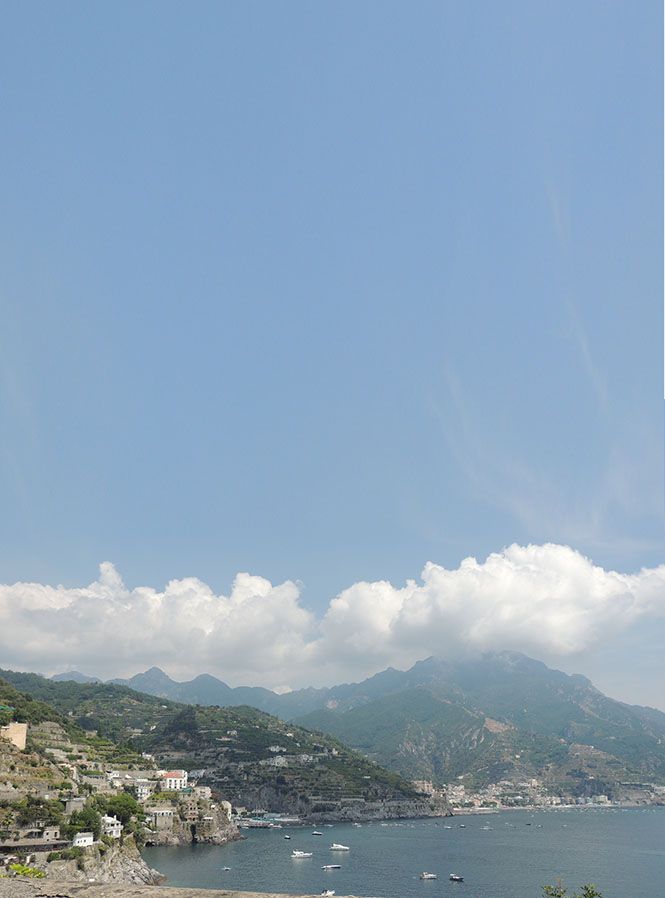 I can't believe it took me as long as it did to figure this out, but now that I know how simple and quick of a process it is - I have a feeling I'll be printing and framing pictures left and right! The image I used is from the Amalfi Coast and I love it because of the view and the gorgeous sky, but it drove me crazy that I didn't get a vertical shot also. I can see this working wonders for photographers too - it can be hard to get the perfect shot, and now it isn't always a lost opportunity if you did!
I know a lot of images won't be this easy to change, but that's next on my list to figure out! Happy editing!
XOXO
I can't believe it took me as long as it did to figure this out, but now that I know how simple and quick of a process it is - I have a feeling I'll be printing and framing pictures left and right! The image I used is from the Amalfi Coast and I love it because of the view and the gorgeous sky, but it drove me crazy that I didn't get a vertical shot also. I can see this working wonders for photographers too - it can be hard to get the perfect shot, and now it isn't always a lost opportunity if you did!
I know a lot of images won't be this easy to change, but that's next on my list to figure out! Happy editing!
XOXO


Thank you so much for this!! It'll make making pictures for pinterest so much easier! <3
ReplyDeleteThe world needs more of these. I absolutely adore photoshop tutorials!
ReplyDeleteThis literally just blew my MIND! Pinning it right now for future reference!
ReplyDeleteI tend to use Canva to create vertical images for the blog that are pin worthy. This is a great idea though for those that have photoshop. I will also have to try it out on Canva.
ReplyDeleteWhat?!!??! This is such a great way to do it! Thanks for sharing! <3
ReplyDeleteYou made this seem to incredibly easy! I am not as well versed in Photoshop, so this was helpful for me.
ReplyDeletePhotoshop and I don't get along haha! I do all my editing on Canva.
ReplyDeleteAlix | www.apintsizedlife.com
I really wanna learn this photoshop but its really not my things. :(
ReplyDeletePhotoshop really is the best. I took a class a few years ago to utilize it to the fullest and it helped so much!
ReplyDeleteGreta. | www.gretahollar.com
On my early years of using PS, google and my best friend were my mentors! Lol. I slowly learned the shortcuts and the tricks myself. It's awesome how much PS has evolved!
ReplyDeleteThis is so neat! It looks so natural, not photoshopped at all. I need to start teaching myself :)
ReplyDeleteThis is so amazing! I'm so thankful that you share this with us
ReplyDeleteMy husband is a graphic designer and even though I have him to help me with photoshop I still have a hard time grasping it. It's like a foreign language! It took me a while to realize I could make images vertical too.
ReplyDeleteWow this is amazing! I actually lost photoshop when I had to do a hard reboot on my computer and I never bothered to get it back because it was too advanced for me. I might have to think about getting it again, though!
ReplyDeletexo, Chelsie @ Hey There, Chelsie
What a beautiful view! I'm just beginning to start using Photoshop and sometimes it's so confusing! Thanks for a great tutorial. It will be a big help when creating Pinterest images.
ReplyDeleteOh my goodness! I could have used this so many times the past few years! Thank you! I never knew you could do it like that!
ReplyDeleteThis is sounds good. I've using photoshop for a years and it really amazing
ReplyDeleteThat's really amazing! I've never knew about photoshop. I think I need to learn more.
ReplyDeleteOh wow this is very useful info to know. I have kind of played around with this kind of stuff but now I will do a much better job.
ReplyDeleteWow! A simple stuff that can make a big difference. This simply photoshop trick can surely work wonders for many!
ReplyDeleteSo simple but it looks so good! I would love to invest in photoshop one day!
ReplyDeletexoxo
Amy | Pastel N Pink
This is such a great tutorial! I love Photoshop!
ReplyDeleteKristin
The Blush Blonde
oh! what an easy trick! will definitely remember this for when i need it!
ReplyDeleteOh, awesome! Thank you for this tutorial!!!
ReplyDeleteStephanie | www.stephanietherese.com
This is so good. Like really, really good!
ReplyDeleteOh my gosh.. this is amazing! I just bookmarked this for real cause I feel like an idiot that I never knew how to do this!!
ReplyDeleteYES! This is perfect for making Pin graphics!
ReplyDeleteSo simple but it looks so good! I love Photoshop! Thank you for this tutorial!!!
ReplyDeletefive nights at freddy’s
ReplyDeleteSosyal medya hesaplarınızın etkileşimini artırmak için güvenilir bir smm panel kullanabilirsiniz. Bu panel hızlı ve uygun fiyatlı çözümler sunarak takipçi ve beğeni kazanmanıza yardımcı olur. Kaliteli hizmetleriyle dikkat çeken smm panel sayesinde sosyal medya varlığınızı güçlendirebilirsiniz.
ReplyDeleteSosyal medya hesaplarımın etkileşimini artırmak için güvenilir bir smm panel kullanmayı tercih ediyorum. Bu panel sayesinde hem zaman kazanıyo hem de hızlı sonuçlar alıyorum. Güvenilirliği ve uygun fiyatları ile dikkat çeken smm panel sosyal medya stratejimi güçlendirmeme yardımcı oluyor. Bu nedenle önerdiğim platformlardan biri olarak öne çıkıyor.